The user interface for eligible candidate is as follows:
Login into the System (Please keep the following information ready for this step) ‐
1. GATE Score card
2. Qualifying degree marks card which has cumulative marks information
3. Category certificate
4. Bank details
The candidate is requested to read the instructions carefully given on every page of the registration portal and then fill the data in appropriate format.
The following screen shot shows the first screen towards the registration:
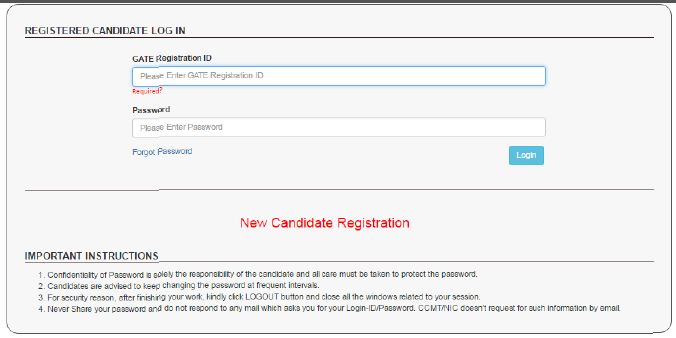
This screen caters to New candidate registration as well as a candidate who has already
registered.
In this screen, for the new registration, click New Candidate Registration. Candidate who hasalready registered need to enter Gate Registration ID and the password. If candidates forgot their earlier chosen Password, they may reset their password as per following ways:
- Reset password using Security Question & Answer chosen during CCMT Registration process.
- Reset password using a verification code sent via text message (SMS) to candidate Registered Mobile No.
- Reset password using a reset link sent via Email to your Registered Email Id.
On click of New Candidate Registration, the following screen will be displayed:
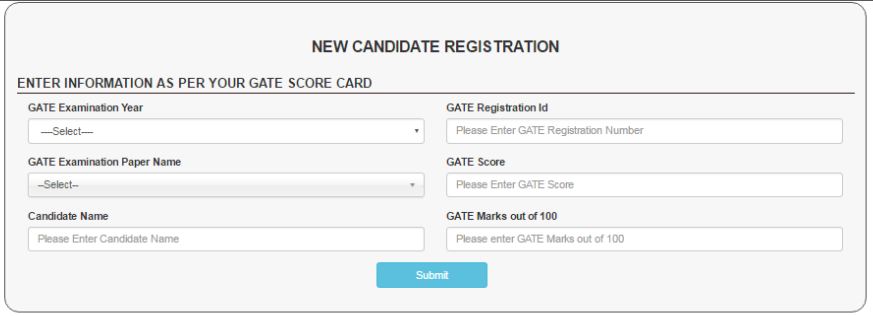
In this screen, the candidate needs to enter
- GATE Examination Year: This is a pull down menu with options 2015 and 2016. Click the relevant one. (The candidate who wrote both GATE 2015 and GATE 2016 are advised to select the GATE Examination year which one she/he feels better. The entries w.r.t item 2, 3, 4, 5, 6 listed below is made based on this selection)
- GATE Registration Id: Enter your GATE Registration Id.
- GATE Examination Paper: This is a pull down menu with all GATE Papers listed. Click the relevant one.
- GATE Score: Enter your GATE Score.
- Candidate Name: Enter your name as in GATE Score card.
- GATE Marks out of 100: Enter the GATE marks out of 100 as in your GATE Score card.
- After the above, press, Submit button
The candidate is taken to the next page, where Candidate’s Consent page (as shown below) is displayed. This page contains terms and conditions for registration and the special eligibility criteria specified by the each of the Participating Institutes.

Candidate is required to go through this page carefully, and click “I agree” to continue with other relevant data entry as shown below:

In the above screen shot, the one with the green background are READ ONLY DATA and cannot be edited. Now the candidate needs to enter the Personal details very carefully. They are:
- Category: This is a pull down menu with options- General, OBC-NCL (i.e., OBC- NonCreamy Layer), SC, ST. The candidate is required to fill this field cautiously.
- PwD Status: This is a pull down menu with options- Yes I No. Candidate need to click the appropriate option carefully.
- Father Name: Candidate need to enter her/his father’s name
- Mother Name: Candidate need to enter her/his mother’s name
- Date of Birth: Use the calendar tool provided and click the appropriate year, month and day.
- Gender: This is the pull down menu with Male, Female and Transgender. Candidate need to click appropriate option.
- Nationality: Pull down menu with option Indian or Foreigner. Candidate needs to click appropriate option.
- Adhaar No: Candidate needs to enter her/his Adhaar Number, which is optional.
- Mobile Number: Candidate needs to ent er her/his mobile number. Note that all SMS communication will addressed to this mobile number.
- Email: Enter your email address. Note that all email correspondence is with respect to this registered email id.
- Complete address: Candidate need to give the complete postal address.
- Pin code: Enter the Pin code.
Next, the candidate needs to enter the qualifying degree details as follows:
1. Qualifying Degree Passing status: Options are Passed / Appearing in Final. Candidate is required to click the appropriate option.

If passing status is ‘Passed’ then
- Select ‘Year of passing’ from Dropdown.
- Select Qualifying Degree and Qualifying discipline Name from Dropdown
- If result preparation Mode is ‘%age’ then enter ‘%age value’
- If result preparation Mode is ‘CGPA’ then select from Dropdown ‘CGPA maximum point scale’ and also enter ‘Obtained CGPA’ then ‘CGPA out of 10″ will be auto calcu lated and displayed in read only mode. ‘CGPA out of 10’ will be used to check the cand idate eligibility for choice filling and seat allocation.
- CGPA out of 10 =(Obtained CGPA/CGPA maximum point scale)*10
If passing status is ‘Appearing’ then
- Value of ‘Year of passing’ w ill be ‘2016’ only.
2. Year of passing: If graduated, the candidate needs to select the year of graduating from the pull down menu.
3. Qualifying degree: Candidate need to select one among- B.Arch/B.Pianning, B.E/B.Tech or equivalent, B.Pharma, MSc, MBBS, B.V.Sc., B.V.Sc. & AH.
4. Qualifying discipline name: Based on qualifying degree selection, discipline names are displayed. Candidate need to select the appropriate one. Note that under B.E/B.Tech qualifying degree option, there is a discipline name option, “None of the above”. The candidate needs to select this option if and only if the listed qualifying discipline is not matching with her/his qualifying discipline.
5. Qualifying Result Preparation Mode: Select the option Percentage or CGPA based on the candidate’s UG level exam evaluation scheme. If Percentage is the selected option, then need to enter the Percentage marks; if CGPA is the selected option, then need to enter CGPA Maximum point scale (one of 10, 9, 8, 7, 6, 5, 4) and obtained CGPA value. Based on CGPA entered, the system displays appropriate value under
‘CGPA out of 10’ box.
Following this, the candidate needs to enter the Bank details:
- Bank name: Enter the name of the bank for financial correspondence.
- Branch name : Enter the bank branch name.
- IFSC code: Enter the IFSC code of the bank
- Account number: Enter the account number in the selected bank for financial correspondence
- Name of the account holder: Enter the name of the account holder.
Then, upload a scanned copy of your (candidate’s) GATE SCORE card. This should be in any one of (G IF, PNG, JPG, JPEG, BMP) format with file size between 50KB and 300KB.
Following this, the candidate is required to select
- Password: A string of 8 to 13 characters including at least one upper case alphabet, one lower case alphabet, one numerical value, one special character (like ! @ # S% A & * -).
- Confirm Password: Repeat the password entered for confirmation.
- Enter the security question: Enter one of the security questions
- Security Answer: Enter the answer for the question selected in the above step.
Note:- The step 3 and 4 are required to recover/reset the existing password, if lost. - Enter security code: The candidate needs to enter the security code which is displayed on the left hand side of the data entry box.
- Next: Candidate needs to click “Next” button which will take the candidate to “Review Page”
Candidate is requested to go through the Review Page very carefully for the possible error/sin data entry. If any, candidate is requested to click “Edit Credentials” button, to correct the error/s. If data entered is correct, the candidate is requested to click “Final Submit” button.
NOTE THAT ONCE THE CANDIDATE clicked “Final Submit” button, she/he is NOT ALLOWED TO CHANGE THE ENTERED DATA.
Registered Candidate Login
Registered candidates should log-in using GATE Registration ld and Password created earlier as shown below:
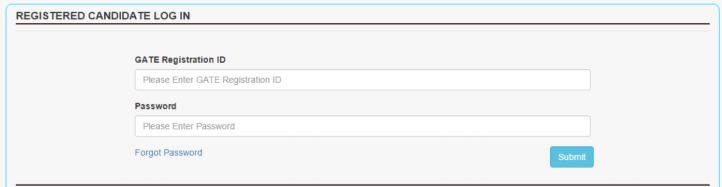
If the candidate furnishes this information successfully, then system will redirect to the candidate’s Home page.
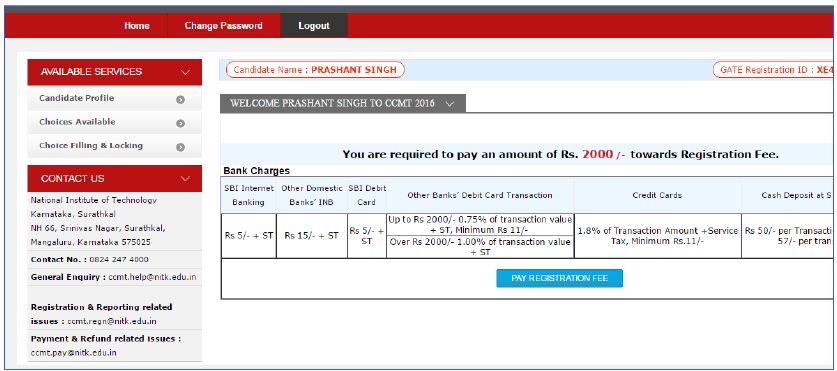
On successful login, the candidate is taken to the page were she/he can do the following:
1. Home: Takes back to the candidate’s home page
2. Change of Password: Allow the candidate to change her/his password
3. Logout: To logout from the portal
In this page, the following sections are also listed:
1. Under AVAILABLE SERVICES
- Candidate Profile: Candidate can see her/his complete profile entered by her/him.
- Choices Available: Shows all the possible choices available based on her/his GATE paper and qualifying degree. Note that candidate can do the filtering by selecting specific Institute Type (All, IIIT, CFTI, NIT), under specific Institute type, specific Institute; under specific Institute , specific programme. Further, there is an option to check the specific programme across all Institutes, and also to take a printout.
- Choice Filling and Locking: This option is enabled only after the payment of Registration fee (Rs. 2000/‐ for General and Rs. 1500/‐ for SC/ST/PwD)
2. Payment Portal
Payment portal allows you to pay the amount through Net Banking /Credit / Debit Card or through SBI e‐Challen.
3. Once the payment is successful, the choice filling option is enabled as shown below. There are two tables, viz. AVAILABLE CHOICE(S) and FILLED CHOICE(S). The candidate needs to select the add option in front of (Institute name, PG Programme) from Available choices list to move the available choice to the FILLED CHOICE(S) list. In Filled Choices list, candidate can change the order of his preference by pressing the appropriate arrows (↑ and ↓), or can delete the selected choice by clicking X.

Further she/he will be having addition options like Arrange filled choices, Choice Interchange, Choice Rearrange, Multiple Deletion and Lock Choice. They are described below:
With click on Arrange filled choices Tab, the following screen will be displayed:
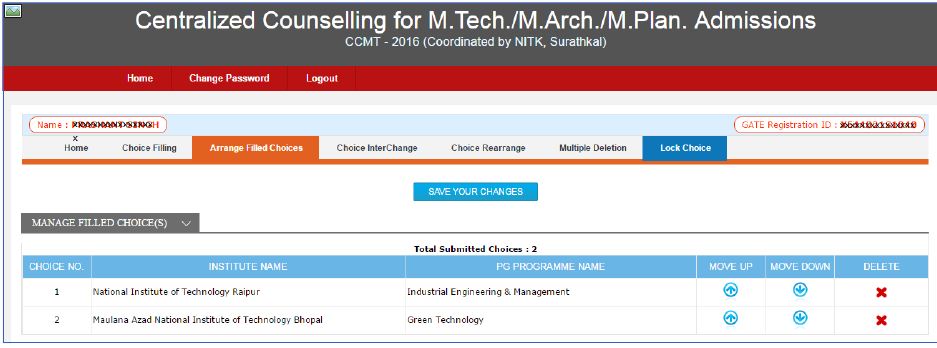
Here, the candidate is allowed to move the selected choices up / down. Further, she/he can delete the selected option.
With the click on Choice Interchange Tab, the following screen will be displayed:
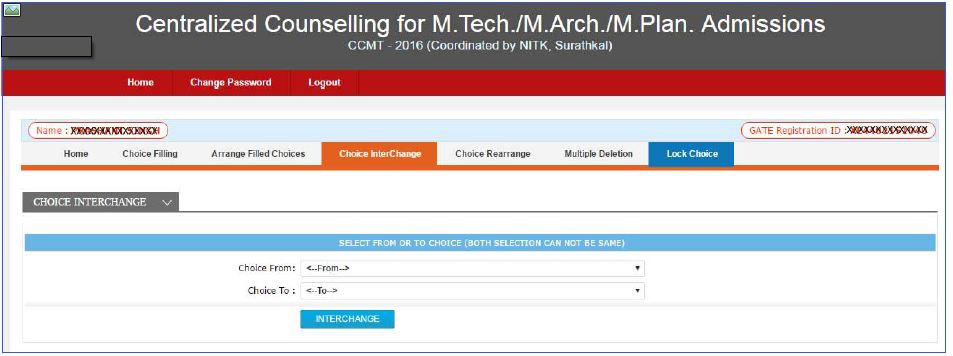
In this screen, the candidate can interchange the Choice From “selected choice” to the Choice To “selected choice”.
With the click on Choice Rearrange Tab, the following screen will be displayed:
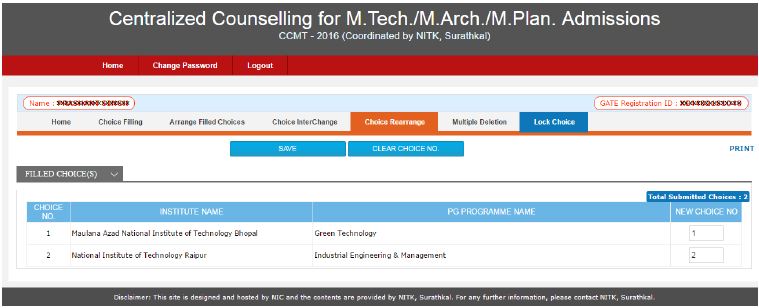
In this screen, the candidate can specify the priority order of the choices under “New Choice No”
With the click on Multiple deletion Tab, the following screen will be displayed:

In this screen, there is a check box in front of the choices entered by the candidate. She/he can select one or more check boxes to delete the selected options.
Candidate can always click on Choice filling (which is on the top horizontal Tab bar) to select the new choices from the available list.
Note :
1. Candidates can fill in as many choices in the order of preference as they wish to from the list of available choices.
2. Choices should be positively locked before last date & time failing which last saved choices will be consider for seat allotment.
3. Choices submitted in the 1st round of counseling will be processed up to Internal Sliding. No fresh choices submission will be permitted in 2nd, 3rd round and Internal Sliding of counselling.
Disable Paging: Clicking on this button allows the candidate to see all her/his selected choices as a single page.
Minimize: Clicking on this button allows the candidate to paginate his selected choices.
With the click on Lock Choice Tab, the following screen will be displayed:

In this screen, the candidate can Lock her/his choices once she/he is completely satisfied with her/his selection of choices. After the locking of choices, the candidate is not allowed to make any modifications in the filled choices. So, candidate is urged to check all the filled choice(s) carefully before Locking.
Note on Locking of Choices & Printing of Locked Choices
- ‘Lock Choice’ button will be enabled as per counseling schedule.
- Candidates MUST lock their choices only after they have finalized them but, in any case, before last date & time. The locking of choices involves a few steps after the “Lock Choice” button is clicked. This includes Agreement and re‐entering of the password, confirming the locking, etc. Candidate should follow all the steps carefully to complete the locking procedure.
- After Locking, system will redirect to the candidate’s Home page.
- If candidates fail to explicitly lock their choices by last date & time, their last saved choices will be automatically locked by system after this deadline.
- Registered candidates who do not exercise any choices or fail to save them will not be considered for seat allotment.
- After locking candidate may take printout of the locked choices.
- NOTE: ‘Saving’ a choice is NOT the same as ‘Locking’ a choice. A choice that is only saved but not locked, can be retrieved later on and modified. The modified choice has to be saved again. The old choice exercised earlier is lost. But a choice that is locked cannot be modified and saved afresh.
SAVE AND CONTINUE: This button saves selected choices. Further modifications if made, will be saved only after clicking this button again.
SAVE AND GO TO HOME: This button saves the selected choices and transfers the control back to the Candidate’s Home.